SVG Perl Script to Make Alquerque Game Boards
Alquerque boards are used for a variety of games. Fanorama, Tigers vs Goats (Bagh bandi), Fox and Geese and other variants similar games are some of the examples. Here is how to make Alquerque game boards in SVG using Perl.
Games that use Alquerque boards:
Fox & Geese
Several variants of this such as pirates vs soldiers or tiger vs goats.
BaghBandi
The aforementioned tigers vs goats. Goats try to surround tigers. Tigers jump/eat goats. Play twice to determine winner.
Tuknanavuhpi
This is essentially checkers with a higher degree of strategy.
Fanorama
A unique game that takes longer to setup than to play, but you slide in and out using strategy to capture all of your opponents pieces.
Creative Problem Solving through Coding
The math and logic to create this Alquerque board was interesting, so we wanted to share it. More importantly is the idea of creative problem solving, and that is what this article talks about specifically. Anyone can copy code and use formulas. It’s harder, and more fun I’d argue, to come up with solutions in the first place, and know how to apply code and formulas.
The rules for the various games using these boards will be put into the games category. This article will talk only about the process of creating the game board and the script involved.
Step 1: Know Your Objective
 One of my favorite verses is Proverbs 29:18 “Where there is no vision, the people perish: but he that keepeth the law, happy is he.” This rings true in all aspects of life. If you do not know what your objective is, you will most certainly have a more difficult time reaching it.
In the book of James 1:6-8, a similar verse echoes “6 But let him ask in faith, nothing wavering. For he that wavereth is like a wave of the sea driven with the wind and tossed. 7 For let not that man think that he shall receive any thing of the Lord. 8 A double minded man is unstable in all his ways.”
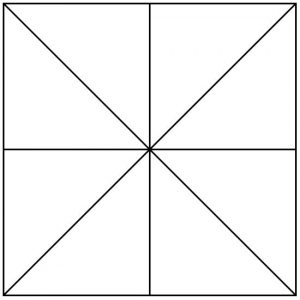
Knowing that I simply wanted a square with lines through it like an X greatly simplified the task list. Now it was time to identify the sub-tasks.
Step 2: Refine Objective
 The first goal was to simply create a 4x4 Alquerque board, which I drew out on paper. I drew a 3x3 board too and saw that the math didn’t work right, but a 6 or 8 did. So I refined my goal to boards with an even number of squares only.
One Bite at a Time
When deciding how to eat an elephant, surely you’ve heard that eating it one bite at a time is the best way. By breaking down the objectives into smaller steps, they problems seem easier. Habbukuk 2 says “Write the vision; make it plain on tablets, so he may run who reads it.” Simply outline in very clear objectives all of the steps it takes to do what your goal requires.
“The important lesson is to break down big tasks into smaller ones, then focus on solving the smaller ones.”
Now we need to Refine Sub Goals
It would appear that the problems can be identified as:
A: Make a Square
B: Make an X through the Square
C: Stack them together orderly
A: Make a Square
This part was easy. I already figured out some code for making a square when doing the other scripts. I skipped over this hurdle as it was already solved.
B: Make an X Through the Square
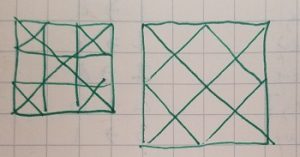
I drew out the board we were trying to make and then broke it down into coordinates. At first, I thought long lines would be best, but after looking at it. After a few thoughts about it, long lines would require recalculating things over and over. If instead I made it from 2x2 squares, I would have all of the coordinates already, and do less math. It would only require advancing 1 square x or 1 square y. That is the path I chose - to make a stack of squares with X inside of them instead of a other ways.
C: Stack the Squares Together, Orderly
One way would be to solve for every possible combination and then use that list. This is obviously not an efficient way, as I’d have to solve by hand. So, I decided to solve a few to see the patterns and then write a program to match the patterns as that is the time consuming part, and I didn’t want to do it by hand hundreds of times.
I knew already that I could print out a grid, as the checkered/squares program was written before this.
Demo Code for Logic Only
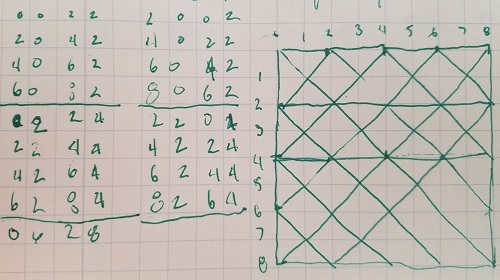
 Then, after the patterns were apparent, I wrote up mock code that only gave me coordinates with a fixed input. On paper this was 3 lines to tell me what logic I wanted to accomplish. Then I started writing the actual code to do the “test”.
Again the goal of this was to make sure my logic was sound. Do I loop over X first? Y first? I had to test it to see before going further.
1 Peter 1:13 explains a key point here. Too much thought and no action isn’t profitable. Take action in all things (test it, try it)!
Therefore, **preparing your minds for action**, and being sober-minded, set your hope fully on the grace that will be brought to you at the revelation of Jesus Christ.
The key point is: take action. Whatever your goal is, put it into motion. We are not blindly coding at this point. We have a goal, and know specific problems to solve.
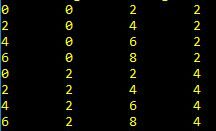
my $squares = 8;
my $steps = $squares / 2;

my @start0;
my @start2;
my $step = 0;

for (1..$steps) {
	push @start0, $step;
	$step = $step +2;
}
$step = 2;
for (1..$steps) {
	push @start2, $step;
	$step = $step +2;
}
foreach my $y1 (@start0) {
	foreach my $x1 (@start0) {
		my $x2 = $x1 + 2;
		my $y2 = $y1 + 2;
		print "$x1\t$y1\t$x2\t$y2\n"
	}
}
foreach my $y1 (@start0) {
	foreach my $x1 (@start2) {
		my $x2 = $x1 - 2;
		my $y2 = $y1 + 2;
		print "$x1\t$y1\t$x2\t$y2\n"
	}
}
Later, I polished it a bit, used better coding practices, commented it, and tried to break the logic with all types of different configurations, like a user might.
#!/usr/bin/perl

# Makes alquerque boards to fit on 1 page A4
use strict;
use warnings;
use SVG;  		# https://metacpan.org/pod/SVG
use Getopt::Std;        # for CLI options

# A4 Paper, .5 margins, Scale of 67 seems to fit
use constant SCALE 	=> '66';	# dots per inch scale, sorta
use constant DOTSIZE	=> '7';		# should be an odd number so line can center
use constant LINEWIDTH	=> '3'; 	#
use constant FILL 	=> 'black';	# can be 'rgb(0,0,0)'  too
use constant STROKE	=> 'black';	# can be 'rgb(0,0,0)'  too

# create an SVG object, canvas which we use for the rest of the draws
# using 9 width and .5 starting dot, means use 8.5 ending dots
# that way it's centered, printable.   However, it's not exactly 8.5in
# the SCALE adjusts the exact sizes.
my $svg = SVG->new(
    width  => 11 * SCALE,
    height => 11 * SCALE,
);

# globals
my ($outfile, $squares, %options);
my @coors;		# holds the steps of cooridinates for each square
my $offset = 1.5;	# start at 1.5 away from sides
my $start = $offset;	# we start at 1.5 as a margin
my @start0;		# we need to start at 0 for 1 array
my @start2;		# and we need to start at 0 + 2 steps for the other array

#----------------------------------------------
# Input and Verify
#----------------------------------------------
# Make sure at least one argument provided
if ( !@ARGV ) { usage("$0 requires arguments,\n"); }

# What are the options they entered
# allowing only "o" or "s"
getopt("os", \%options);

# How many squares?
if (defined $options{s}) {
    $squares = $options{s};
    unless ($squares > 0) { usage("That board is too small.  Size matters.") }
    if ($squares % 2) { usage("Alquerque boards should be an even number of squares.")}
} else { usage("UNKNOWN SQUARES"); }

# Basic Out Put File Checks?
if (defined $options{o}) {
    $outfile = $options{o};
} else { usage("MUST PROVIDE FILENAME"); }

if (keys %options > 2) {
	usage("You have too many options as input")
}
#----------------------------------------------
# Initial calcs
#----------------------------------------------
# figure out how to fit their want, into our sizes
# we want to fit entire board in 8 inch square
my $step = 8/$squares;  # how big should each square be?
my $end = 8/$step;		# should just be the same as squares

# Lines are xy start and xy stop coordinates, in inches
my $steps = $squares / 2;
my $stepsq = $offset;

# loop over to get our xy start list from 1 to number of squares
# as step changes based on squares, advance by "step" units
# @coors stores the basic unit, 2,4,6,8 or 1,2,3,4 etc based
# on size of step.  Notice the offset for margins ($start)
# we need this array for later loops, $click isn't even used
foreach my $click (1..$squares) {
	push (@coors,$start);
	$start = $start + $step;
}

#-------------------------------------------
# define data
#-------------------------------------------
my %dots;
my $dotcounter = 100;

# Squares are xy start then l,w in inches
my %squares = (
	sa => [0,0,11,11,0,3],		# border/edge of board
);

# make our squares based on how many loops we know we needed.
# would it be easier to use a x..y format here based on squares?
# save 3 lines of code... or did I need to bump the offset
# so I have a loop that matches the printable board?
# squares + dots in same loop
foreach my $x (@coors) {
	foreach my $y (@coors) {
		squares($x,$y,$step,$step,0,3);
		$dots{$dotcounter}=[$x,$y]; $dotcounter++; # gets everything except outer edge.
	}
}

# Now the Dots
# dots on final y column
foreach my $y (@coors) {$dots{$dotcounter}=[$start,$y]; $dotcounter++;}
# dots on final x row
foreach my $x (@coors) {$dots{$dotcounter}=[$x,$start]; $dotcounter++;}
# final dot in SE corner
$dots{$dotcounter}=[$start,$start]; $dotcounter++;

# Finally the Lines
for (1..$steps) {
	push @start0, $stepsq;
	$stepsq = $stepsq + 2 * $step;
}
# What is a better way to write this?
$stepsq = 2 * $step + $offset;
for (1..$steps) {
	push @start2, $stepsq;
	$stepsq = $stepsq + 2 * $step;
}
# My x and y arrays are built for / lines
# loop over each and draw the lines
# double duty and populate %dots too please
foreach my $y1 (@start0) {
	foreach my $x1 (@start0) {
		my $x2 = $x1 + 2 * $step;
		my $y2 = $y1 + 2 * $step;
		lines($x1,$y1,$x2,$y2);
	}
}
# now loop over the \ lines
foreach my $y1 (@start0) {
	foreach my $x1 (@start2) {
		my $x2 = $x1 - 2 * $step;
		my $y2 = $y1 + 2 * $step;
		lines($x1,$y1,$x2,$y2);
	}
}

#----------------------------------------------
# Logic
#----------------------------------------------
foreach my $square (sort keys %squares) {
	squares($squares{$square}[0],$squares{$square}[1],$squares{$square}[2],$squares{$square}[3],$squares{$square}[4],$squares{$square}[5]);
}

# add the dots... we could of done this loop in the first place..
foreach my $cor (sort keys %dots) {
	dots($dots{$cor}[0],$dots{$cor}[1]);
}

# lines were done as built
#-----------------------------------------------------------
# usage: Educates user on how to run program
#-----------------------------------------------------------
sub usage {
    my $msg = shift;
    print "\n\n$msg\n\n";
    print "Usage: $0" . ' -o <somefile.svg> -s <int>' . "\n\n";
    print "-o some output file name\n";
    print "-s how many squares do you want (an even number)?\n";
    exit;
}

#----------------------------------------------
# dots sub
#----------------------------------------------
sub dots {
	# takes 2 arguments, makes  a dot
	my $x = shift;
	my $y = shift;
	$svg->circle(
		cx => $x * SCALE,
		cy => $y * SCALE,
		r  => DOTSIZE,
	);
}

#-----------------------------------------------------------
# lines: really a 2 point polygon that looks like a line
#-----------------------------------------------------------
sub lines {
	# 4 arguments, xstart, ystart, xstop, ystop
	my $xstart = SCALE * shift;
	my $ystart = SCALE * shift;
	my $xstop = SCALE * shift;
	my $ystop = SCALE * shift;

	my $path = $svg->get_path(
    	x => [$xstart,$xstop],
    	y => [$ystart,$ystop],
    	-type => 'polygon');

	$svg->polygon(
	    %$path,
	    style => {
	        'fill'           => FILL,
	        'stroke'         => STROKE,
	        'stroke-width'   => LINEWIDTH,
	        'stroke-opacity' => 1,
	        'fill-opacity'   => 1,
	    },
	);
}

#-----------------------------------------------------------
# squares: draws a square starting at xy and expanding w,h
# really a rectangle function
#-----------------------------------------------------------
sub squares {
	# accepts 6 values:
	#  x y coord, w h specs, fill opacity and line weight
	my $x = shift;
	my $y = shift;
	my $w = shift;
	my $h = shift;
	my $fop = shift;
	my $lw = shift;

	$svg->rectangle(
	    x => $x * SCALE,
	    y => $y * SCALE,
	    width  => $w * SCALE,
	    height => $h * SCALE,
	    style => {
	        'fill'           => FILL,
	        'stroke'         => STROKE,
	        'stroke-width'   => $lw,
	        'stroke-opacity' => 1,
	        'fill-opacity'   => $fop,
	        # $fop must be 0 or 1
	        # 1 makes a solid square, 0 makes an outline square
	    }
	);
}

# Try to center the title, it's approximate related to SCALE
my $title = "Alquerque $squares x $squares";

# for SVG< keep - but will probably delete for boards
title($title);

#----------------------------------------------
# Text, at SCALE of 142, 6.5 letters per inch, Serif Font
# Text, at SCALE of 96, 5 letters per inche, Serif Font
# Text, at SCALE of 67, 4.5 bleh bleh
# Take half of estimated lenght of title, subtract it from center
# that should start half before center, and then half after center
# adjust the /5 down to move left, up to move right
#----------------------------------------------
sub title {

	my $ltitle = length($title);
	my $xtitle = 5.5 * SCALE - ($ltitle /4.5 * SCALE)/2;

	$svg->text(
	    id => 'l1',
	    x  => $xtitle,
	    y  => SCALE * .95,
		style     => {
	        'font'      => 'Serif',
	        'font-size' => SCALE / 2,
	        'fill'      => FILL,
	    },
	    )->cdata($title);
}

# all done, do et
# now render the SVG object, implicitly use svg namespace
# this clobbers any existing file and allows user to overwrite
open my $fh, ">:encoding(utf8)", $outfile or die "$!\n";
    print $fh $svg->xmlify;
close $fh;
Enjoy the Good of Your Labor
The final product, produces boards exactly like we planned. We ran it a few times to make the boards we wanted and saved the SVG files for later use with the CNC router that will cut the game boards.
We Enjoy Coding
Coding isn’t fun for everyone, but it is something we love to do. Ecclesiastes 3 talks about the joy of your labor.
12 I know that there is nothing better for them than to rejoice and to do good as long as they live; 13 and also that every man should eat and drink and see and _enjoy the good of all his labor—it is the gift of God_.
God gave us problems to solve, and skills to solve them. We enjoy coding, one of our labors. We enjoy problem solving. I also enjoy playing games with my family and kids. What do you enjoy?
We help solve IT related problems, such as writing programs. If you want help, please contact us and we can give you a free quote on custom programming so you can spend more time doing the labor you enjoy, and we can enjoy coding for you!
8x8 Alquerque Board From Perl

4x4 Alquerque Board From Perl
