Hugo Github Netlify Checklist
Overview
Free hosting Cloudflare protection and CDN for small/personal sites with ability to scale for business use.
- DNS points to Netlify for your sub/domain
- View and edit static markdown on your local PC
- push to git, commit revisions
- Automatic trigger pulls the updated git repo into Netlify
- Netlify auto-builds and sends static files to CDN
Dynamic content is handled with javascript on client side. Forms and interaction are done through javascript and 3rd party services.
Actual cost is free up to 500MB of storage, and 100GB of bandwidth. You only pay cloudflare for the domain name yearly. End result is a free, fast site that is extremely hard to hack.
Workflow
Once you are setup, you do the following:
- Edit Markdown files, create content, verify local first
git add .git commit -m "your revision notes"git push- wait 2 minutes to see results on CDN
If there is a mistake or any problem, you have the magic of github to restore to that snapshot of time (commit often). The rest of the document gets you to this point above (a small 3 command solution), and once you are setup, it’s very easy to use. Do not be intimidated by the documention. You only do all of the steps below the first time you setup a site and install everything.
Prerequisites
Account Setup Tasks:
- Netlify Account account signup for CDN
- GitHub for file storage
- Cloudflare for DNS Protection/Management
Set these up before trying to get hugo setup. Just create the accounts for now. We’ll go over detailed setup later
Local PC Setup Tasks:
On your local PC you will need these things completed:
- SSH via Git Bash, or Terminal Installed
- Go Lang Installed Go is a requirement for Hugo
- Hugo Installed Hugo is the static site generator, test installation using
hugo version - ssh keys
ssh-keygen -t ed25519 -C "[email protected]" - Markdown/Text Editor installed (notepad++, vscode, etc)
Detailed Setup
Do the prerequisites first!
DNS (Cloudflare)
To manage a domain, you must first “Add Domain”. Then you will either transfer it in, or register a new domain. Cloudflare is free, but some of their advanced services have a fee. They are the cheapest registra and have all of the fancy options you can imagine. They do not accept ALL TLDs though (ie sites.in was not allowed).
We want to manage the domain through cloudflare, regardless of where it was purchased, and ideally we are using cloudflare for all DNS instead of working with two registrars. AWS for example will charge you for a “hosted zone” even if you manage it in cloudflare.
DNS Tasks
- Manage domain in Cloudflare
- Transfer or register domain if required
- Setup DNS Records in Cloudflare
I’ve provided instructions for whichever path you need.
New Domain
Domain Registration > Register Domain
Once you register it and the registration is complete it should automatically be added to the “Manage Domain” list.
Transfer Domain
Domain Registration > Transfer Domain
By default, if you have a domain “managed” by cloudflare it will appear in the “Transfer Domains” section if it’s not transferred already. If there is no domain listed in the transfer, then you do not have it “managed”. New domains will instead use the “Register Domain” menu option.
You need to do some things before transferring.
- copy DNS records into cloudflare so you don’t have downtime
- update NS records on the leaving registrar
- unlock the domain on the leaving registrar
- get transfer code from leaving registrar and use in cloudflare
- wait up to a few hours for the transfer to complete
You cannot transfer domains within a short time of buying them, usually 45 days. You can still “Manage” the domain through cloudflare while you wait for it to be transferred into cloudflare.
Manage Domain
Domain Registration > Manage Domain
In cloudflare (can be any registrar really, but I am recommending cloudflare), you need DNS records setup:
You will eventually want DKIM, SPF, MX, etc You NEED the following for using netlify and cloudflare though:
| REQUIRED | RECORD | VALUE | PURPOSE |
|---|---|---|---|
| OPTIONAL | ALIAS, ANAME or flattnened CNAME | apex-loadbalancer.netlify.com | Uses Netlify Global CDN/Routing Better, caveat: does not use DDoS Protection! |
| YES! | A record | @ to 75.2.60.5 | Backup in case you can’t do flattened CNAME, points to Netlify Load balancer |
| YES! | CNAME | www to | maps www to apex too |
| YES! | NS | Per cloudflare transfer settings | Free SSL requires this to be correct |
Do not use flattened flattened CNAME while using Cloudflare DNS Proxy. Use one or the other. I prefer Cloudflare DNS proxy.
Additional DNS info
This means you either disable cloudflare proxying or use flattened CNAME. The choice is yours, do not do both though. Flattened CNAME is optional, if you use the A record above instead. Flattened CNAME with cloudflare proxying will be faster, but will lose cloudflare protections and metrics.
As this takes time, sometimes several hours of waiting, you need to get DNS records done first. If you have copied the same records over such as MX, SPF, etc you should not have down time at all.
Obviously the A record cannot be the same if you were not previously using netlify load balancer!
I do not know Netlify’s current ip for the global load balancer. As of the time of writing, this is the information I had:
- Netlify IP Docs to Configure External DNS
- Validation of IP: https://www.netify.ai/resources/ips/75.2.60.5
DNS Examples
You will likely only be using option 1 (Apex Domain Only), but I’ve shown other options to help explain how the DNS setup works.
workerboost.com (Apex domain only)? Use A record of 75.2.60.5 and CNAME of www pointing to their apex domain.
grimoire.jamesfraze.com (subdomain). Use CNAME in cloudflare. CNAME is
grimoire, value isgrimoire.netlify.app. Add the custom domain found in Netlify under “Domain settings” for my grimoire.netlify.app. The netlify project for grimoire is linked to my grimoire github repor usesgrimoire.jamesfraze.comas a custom domain, primary domain.tabs.jamesfraze (another subdomain). Use CNAME in cloudflare. CNAME is
tabs, value istabs.netlify.appIn the tabs project in netlify, which is linked to my tabs repo on github, I have a custom domain, primary domain oftabs.jamesfraze.comjamesfraze.com (apex domain routed to calendly). Setup a custom rule in cloudflare for that purpose (Rules > Page Rules):
| Name | Value |
|---|---|
| URL | jamesfraze.com/* |
| Forwarding URL | 302 |
| Destination URL | https://calendly.com/jamesfraze |
Hosting (GitHub)
We setup Github first, and make a repo because Netlify needs it. You also should have a repo in place for hugo and git commits. You can do these steps out of order, but that complicates things. Github is not required, but it provides the advantage of free storage space, scales if you need more, and has automatic revisions.
Github Tasks:
You need an ssh key first, to let github know who you are. You will put your public ssh key in github. If you do not already have a key created (look in .ssh first!), create one. Type this on your local pc from the account you will normally be using to do your work:
ssh keygen -t ed25519 -C "[email protected] or any comment"
I use a password on my key, password is optional. This will create a private and public key in .ssh folder with the proper permissions. Next, you will copy your public key so you can paste it into github, which authorizes your pc to make changes via ssh:
type .ssh\id_ed25519.pub
That will give you a key that looks something like this:
ssh-ed25519 AAAAC3NzaC1lZDI1NTE5SOMETHINGLIKETHIS5vybt1U5+Aj7C2220la823ljhagk [email protected]
This is the string you’ll need for the next part.
- Create a github account
- Enable MFA
Account > Settings > Password and authentication > 2FA - Create a private repo
github > Reposistories > New - Setup ssh keys
Account > Settings > SSH and GPG Keys > New SSH Key
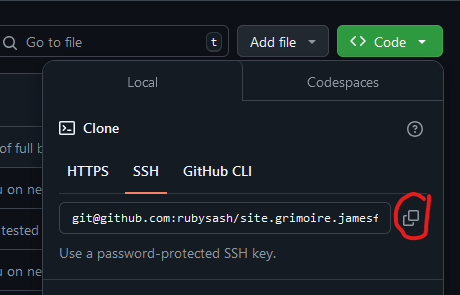
When you create a private repo, get the .git url as you will need it later for the setting the git repo url:
After you save your PUBLIC key in github you can test connection like this:
ssh -T [email protected]
Your first time it will prompt for the key fingerprint acceptance, after that it should say something like:
Hi username! You've successfully authenticated, but GitHub does not provide shell access.
Make sure your key works with github or troubleshoot it before continuing.
CDN (Netlify)
Netlify is great, but has a caveat. There is no option to turn off usage once you pass the free tier. I just read about a Netlify Billing Warning 104k DDoS. In the worst case scenario you are DDoS’d without protections (cloudflare has protections!) and your bill goes astromomical.
I like to use cloudflare as a proxy for DNS to help prevent most instances of this scenario. DDoS protection is worth paying for, but Cloudflare also does it free (Site > Security > DDoS)
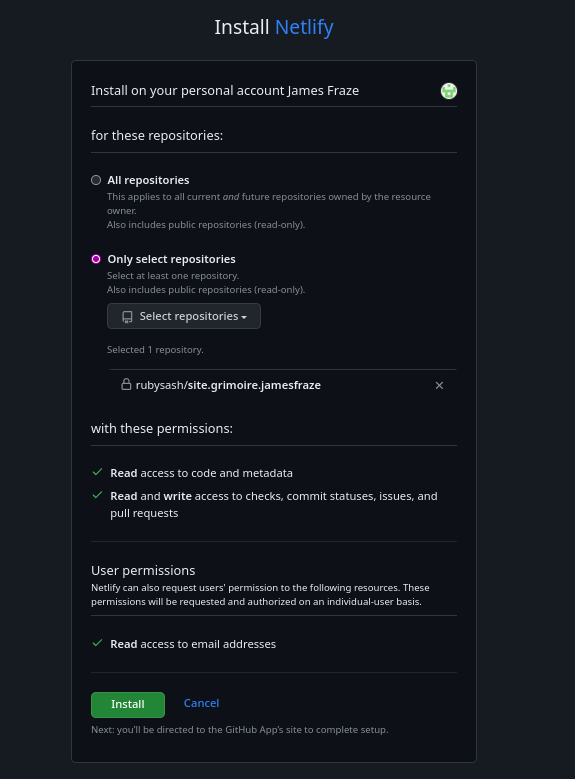
Netlify will require a connection to your specific github repo. The github repo does not need to be public. Netlify will authorize via your authentication and use only the repo you expose to it.
There are other CDNs, such as cloudflare. My preference is Netlify. This guide is about using netlify, but you can use any CDN you wish.
Netlify Tasks:
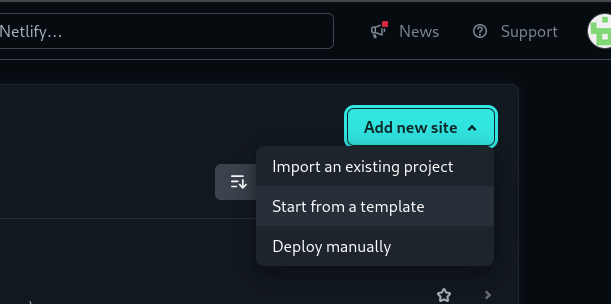
Add a new site, import existing project:
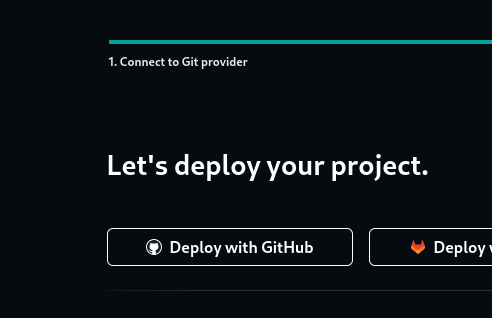
Deploy with GitHub:
Then connect the specific repo:
Modify the remaining settings in Netlify:
- Create a new site (Sites > Add a New site > Existing Project > Github “single repo”)
HUGO_VERSIONvariable (Site Configuration > Environment Variables > yourhugo versioncommand, ie: 0.137.1)- Build Command (Site Configuration > Build & Deploy > Build Command >
hugo --gc --minify -b $URL) - Publish Directory (Site Configuration > Build & Deploy > Publish Directory >
public) - Primary Domain (Domain Management > Add primary domain > yoursite.com)
- SSL/TLS (Domain Management > Verify and Add Certificate)
Make sure your DNS is properly setup before doing the SSL/TLS.
If you are a paid account, you might also set your Access & Security settings such as WAF, JWT, Firewall, Security Access, OAuth2, etc.
Static Site Generation (Hugo)
Up to this point you setup the infrastructure that will support your content. Now you are going to setup your content generation system. Hugo is a static site generator. It uses Markdown to create static HTML. When you work locally you’ll view your changes through the default hugo local server at http://localhost:1313. When you are happy with your changes, you will commit using git and it will trigger the netlify deploy automatically.
You already typed hugo version from above, so I know you did the prerequisites of installing GoLang and Hugo. Here is how to create a new site and use hugo:
hugo new site somenamehere
cd somenamehere
Now, you will want to bring this into git. Get your .git location by looking at our repo (remember the git url from the green code button above?). It should appear on the green “CODE” button when you view your repo. Make sure you are in your new directory and type (replace the .git with your actual line):
git init
git add .
git commit -m "first commit"
git branch -M main
git remote add origin [email protected]:yourgithubaccount/your-repo-here.git
git remote set-url origin [email protected]:yourgithubaccount/your-repo-here.git
git push -u origin main
This sets your new directory somenamehere to be connected to your remote repo. If there are no errors you are connected correctly and future workflows will be easy.
You can verify your remote url using git config --list
NORMAL WORKFLOW
You now have a working site infrastructure and tools. The the connections should be all setup.
You will edit files in the “content” directory and then push to git.
You run all of these commands from the root of your hugo site, ie somenamehere that we created above. Workflow for multiple people doing checkins and commits is different than this workflow, which is designed for a single person doing everything.
Start Hugo in Other Terminal
cd somenamehere
hugo server --noHTTPCache --disableFastRender --port=1313
Monitor in Local Browser
http://localhost:1313 will update realtime as you edit the markdown files.
Create Markdown Content
Edit data in your content and static directories. If your site is setup correclty your index.md files, folders, and somefile.markdown files should be appearing, assuming your theme allows this.
Some tutorials will say to edit files in /posts/, but then your entire structure must use /posts/. Instead, later we are going to use a theme, and the theme will allow structured content like on this site. If you do not see your changes, but do see a hugo site “up” with blank pages, it’s likely because your theme needs configuration.
Git Workflow (Editing)
git add .
git commit -m "something"
Keep adding and committing as often as you like. Each commit is a restore point of the changes you’ve done, so make your comments meaningful. I might commit 50+ more times a day depending on how much work I’m doing. If you do not commit, then you do not have a restore point.
Git Workflow (Publishing)
When you are ready to publish to github and then have your data built and set out to netlify just push to github from your root directory. I typically only do this a few times a day.
git push
Other Stuff
Hugo Themes
The generic hugo theme is very dry and limited. There are many themes though; I am using hugo-theme-techdoc. To install and use this theme:
git submodule add https://github.com/thingsym/hugo-theme-techdoc.git themes/hugo-theme-techdoc
git submodule update --init --recursive
Modify your config.toml or hugo.toml to include the theme (theme = ‘hugo-theme-techdoc’)
If using the hugo-them-techdoc you will need to use the linked config.toml and delete the hugo.toml that comes default. Other themes have different requirements, but this is how hugo-theme-techdoc works.
Each theme is different. Another great theme that looks more like a blog/business page is Magnolia. Magnolia has a different method to install and setup a new site, you will NEED to Read it’s docs for setup. It does not use the hugo new site something command at all.
I have additional themes information at Hugo Themes. Remember each theme is slightly different in how it’s setup.
Hugo Partials
Partials are blocks of code that you can import into your html. Consider the use case of a form, advertisement or other common block that you want throughout your entire site with easy management. Partials are the way to do it. See Hugo Partials. Partials can work with all themes.
Hugo Short Codes
Short codes are dynamic golang code that run at build time. A use case for me is building all menus and submenus no matter what I put as categories. My shortcodes figure that out for me and build the menu system in html. See Hugo Shortcodes. Short codes can work with all themes.
Hugo Custom CSS
All themes are basically html, css and possibly javascript. Customize like you would any theme or html page: See Hugo custom css
Hugo Markdown Editor
I wrote a tool to help manage large markdown organizations. See [Hugo Markdown Editor][http-servers/hugo/hugo-markdown-editor]. It will save you quite a bit of time if you have hundreds of articles like I do. It makes templates for you, ensuring your frontmatter/headers are correct.
Troubleshooting
- Identify Wrong Portion: Hugo > Github > Netlify > DNS/TLS?
- Hugo? works locally? Likely a config.toml setting or version problem
- GitHub?
git config --listmight show clues - Netlify Settings? Check Build Settings, Environment
HUGO_VERSION, and ask the Netlify AI - Netlify Deploys? (Site > Deploys > Last Deploy > Look at entire page)
- DNS? Cloudflare (Site > DNS > Records)
- TLS? Cloudflare (Site > SSL/TLS > Overview > Strict Mode)
- TLS? Netlify (Site > Domain Management > SSL/TLS)
- Page Speed? Use Google Webmaster Tools/Lighthouse/Chrome Dev Tools to identify why.